Adobe Flex – BlazeDS – Deployment on Tomcat Integrated Server in MyEclipse Integration – Step by Step
Hi Folks,
This Article/Post is in follow with my previous article on MyEclipse Flex Builder Integration – Installation Steps for Flex Builder Plugin in MyEclipse. Some of the folks, who went through the article, applauded & I was little esteemed by seeing my first article being published in MyEclipse newsletter of Jan 2009. Thank you MyEclipse team for the recognition given by you folks. Keep up the Good Work. Saying this let me tell you the motto behind writing this article. After seeing the article, many of my Indian Developer folks went through steps & were able to set up the MyEclipse with Flex Builder Plugin. After that, some of the folks did try to use BlazeDS on top of Tomcat which comes with MyEclipse. Some of them have failed to integrate, either because of the steps followed or because of the confusion involved in the steps of integrating the Flex Builder & MyEclipse together. So to resolve all doubts, issues faced, I was forced to write this article, which basically explains step by step procedure of deploying BlazeDS on Tomcat server in MyEclipse & also configuring Flex Project to work along with it. I will try to make it as simple as possible. As in my previous article, here to I will try to upload a small video & also explain step by step in words along with the help of snapshots.
Note: The article or post is governed by following disclaimer policy.
I have uploaded a small video, which addresses the steps involved in integrating the BlazeDS on Tomcat of MyEclipse. You can also watch the same below. Kindly bare with quality, it’s not of best as I am using the free tool.
Prerequisites :
- Should have integrated MyEclipse With Flex Builder
- Download the latest release of binary version of BlazeDS from Adobe Open source site – Point to be noted BINARY DISTRIBUTION TO BE DOWNLOADED NOT ‘TURNKEY’ VERSION – Turnkey version has Tomcat & Samples inbuilt, so this is not the version we are looking for.
- After download, unzip the zip file & further unzip the “blazeDS.war” file to a temp folder. The below snapshot shows the same.
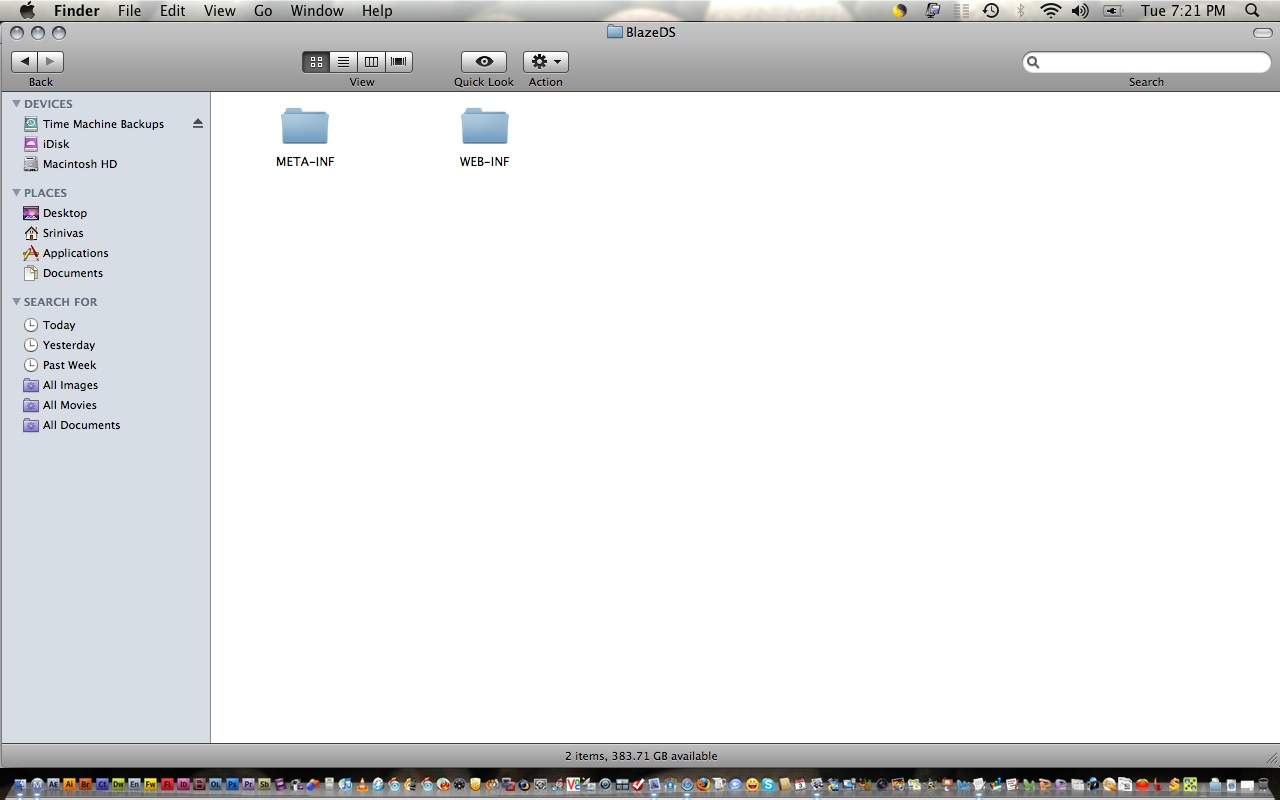
- As you can see it contains two folders “META-INF” & “WEB-INF”. Keep this in one place, now let’s return to MyEclipse.
- Open MyEclipse.
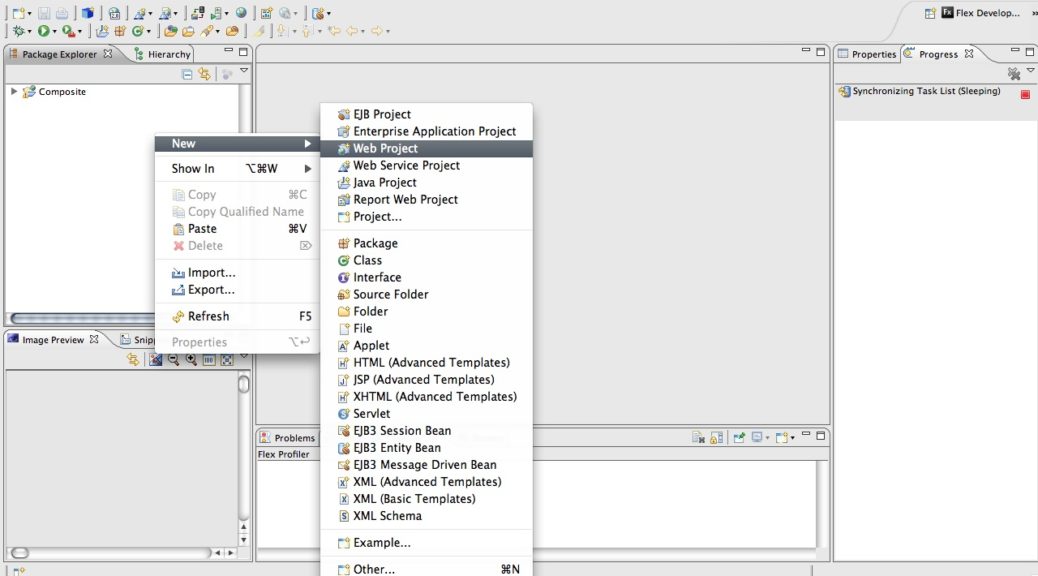
- Create a new Web Project as shown below
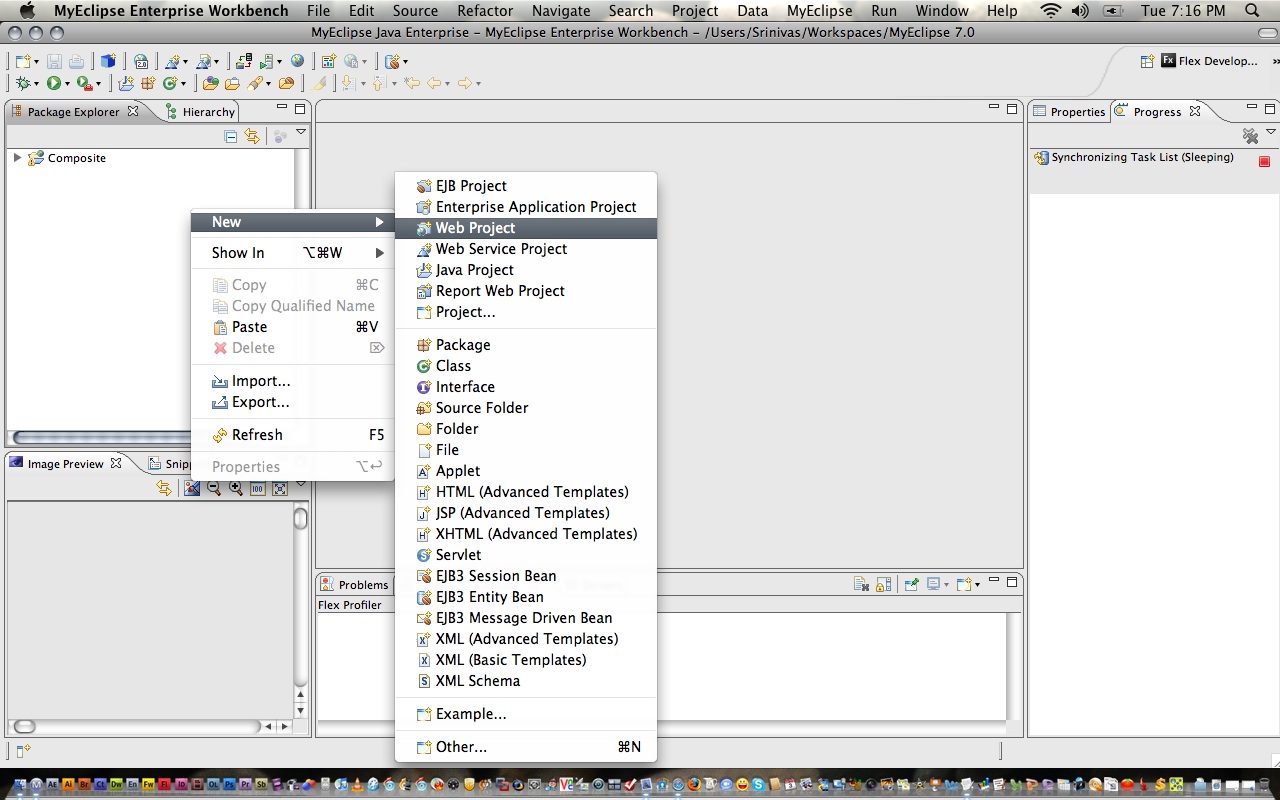
- You will end up in “New Web Project Window”. Fill in all credentials as shown in below image
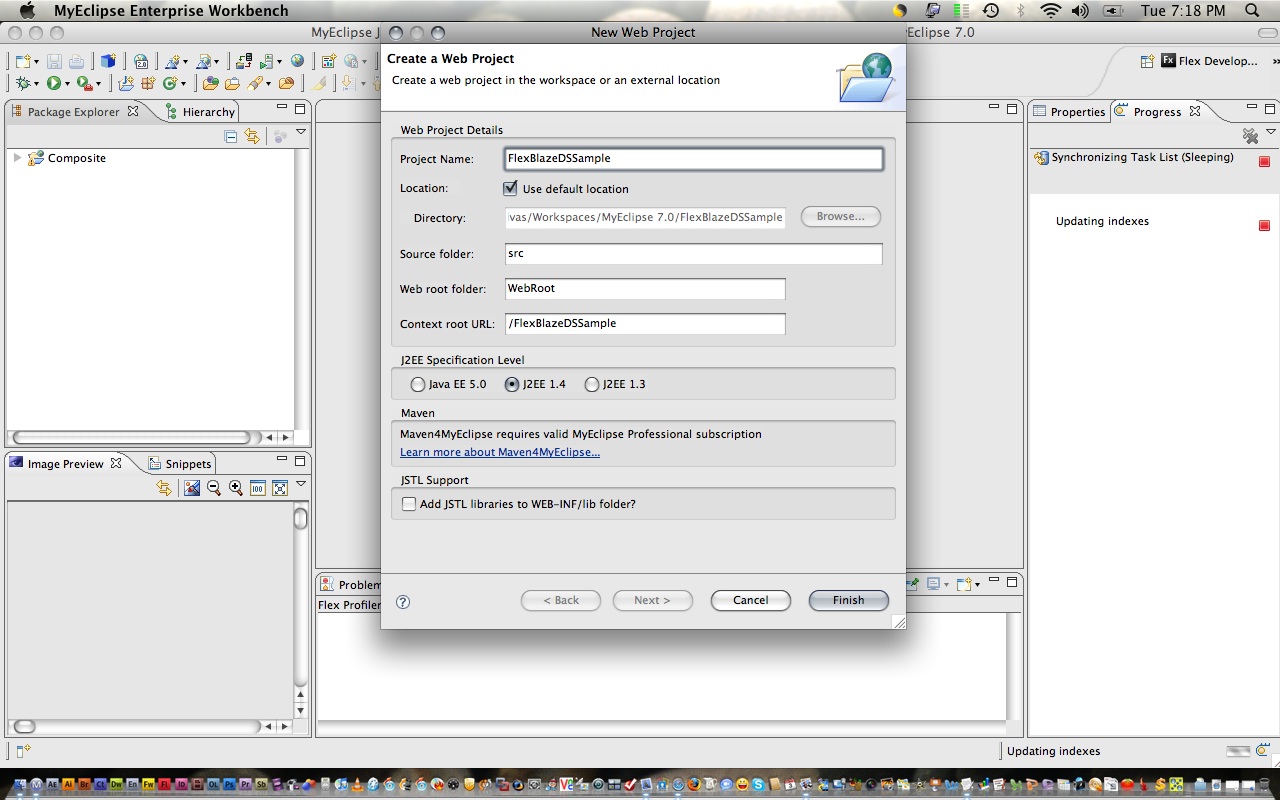
- [Note: Below are the credentials I have used to fill in]
- Project Name: “FlexBlazeDSSample”
- Location: “use default location”, you can have your choice of the directory here
- Source Folder: “src”
- Webroot folder: “WebRoot”
- Context root URL : “/FlexBlazeDSSample”
- Remaining I have left as it is for defaults.
- If you have JDK or Java EE 5.0 Version of Java installed, it might alert for the same, click Ok or yes button. It basically means to use JDK 1.4 or whatever default version selected to be used for this project [Make sure it should be JDK 1.4 or higher – as it is required for BlazeDS]
- Click on Finish to See Web Project being created
- Now minimize MyEclipse, and go to “FlexBlazeDSSample” Project root folder which you created just a few steps before. In general scenario it would be present in “[WorkSpace Folder] > FlexBlazeDSSample” Folder or path.
- Also, open the blazeDS.war extracted folder
- Copy both “META-INF” & “WEB-INF” directories from blazeDS extracted the folder to “FlexBlazeDSSample” project’s “WebRoot” Directory.
- Probably it will ask you for existences of a few files & and ask you for confirming the operation.
- Click on the “YES” button to overwrite the files. Don’t panic this operation is not harmful
- Now open or maximize the MyEclipse Editor
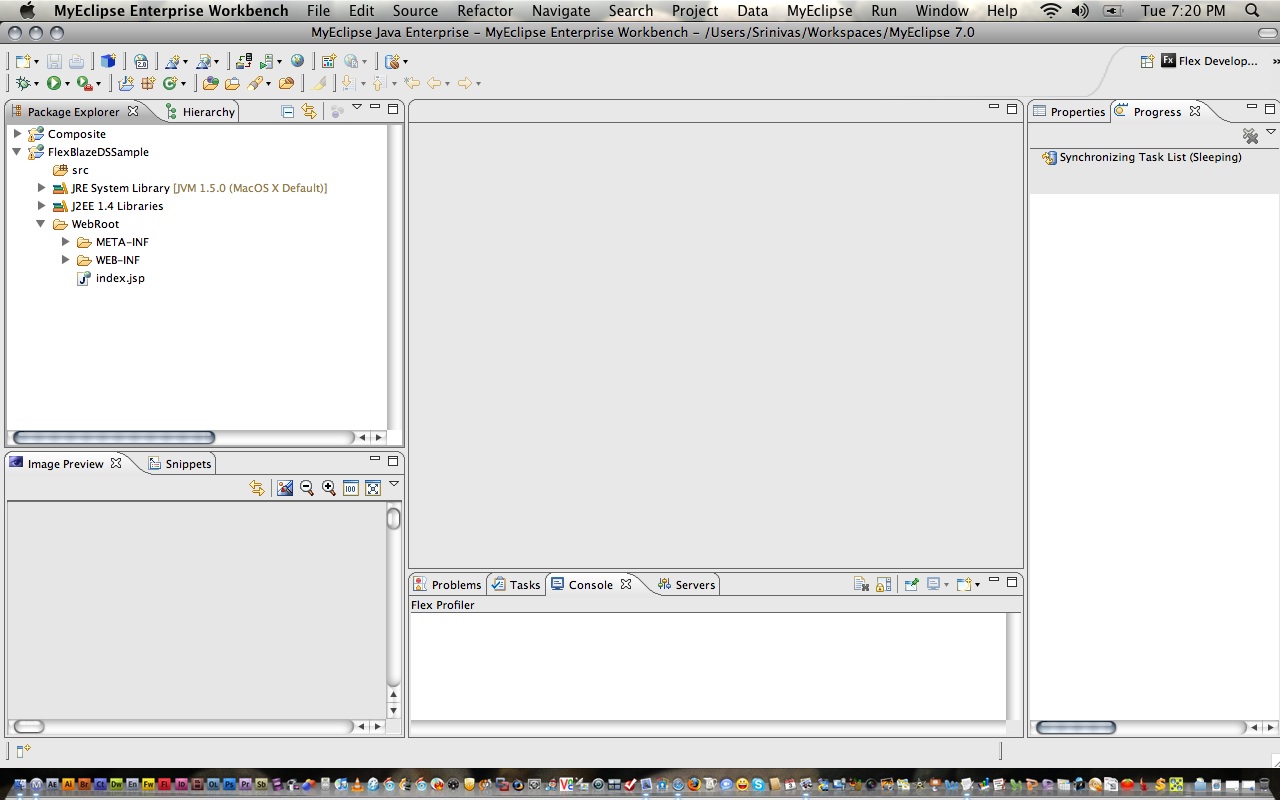
- Refresh “FlexBlazeDSSample” project
- You should be seeing the latest files along with “BlazeDS” config files under “WEB-INF” > “flex” folder.
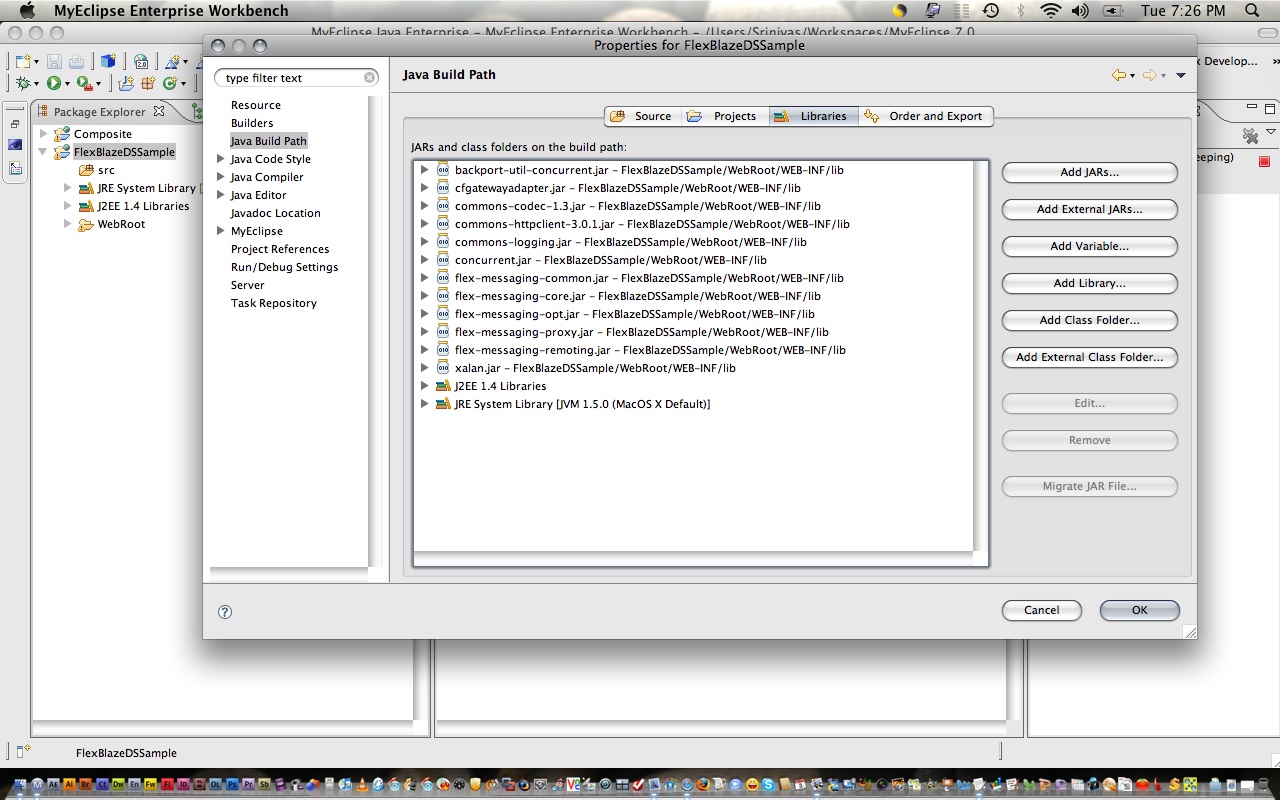
- And checking the properties of project & moving to java build path > library should also show blazeDS libraries
- Below snapshots should be the outcome
- Close all properties window’s or any windows opened.
- Go to Windows, Open Server Window View, you would basically see “Tomcat” Server with a stopped status
- Click on Start Button to Start the Server
- Now you need to deploy the web project which you created just now
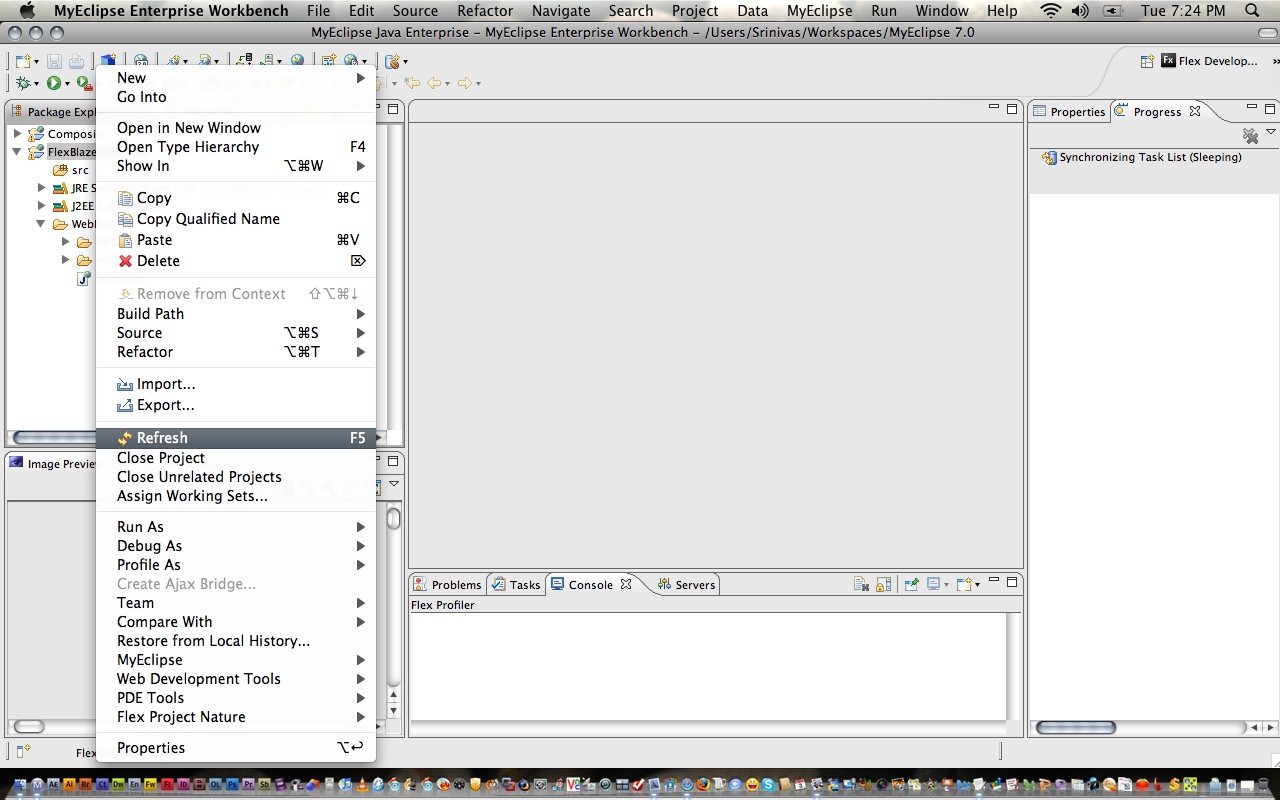
- Right Click on Tomcat Server on Server Panel as shown below
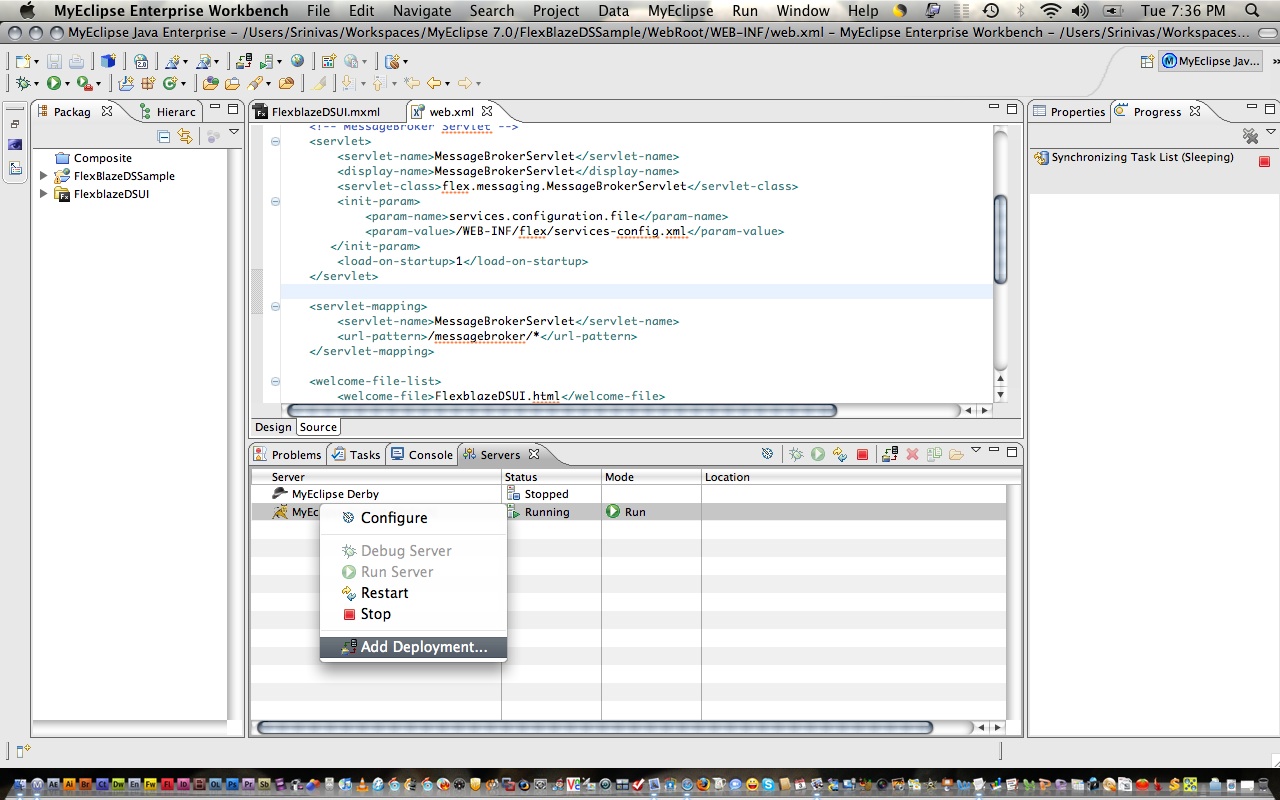
- Click on Add Deployment
- You will end up in “New Deployment” as shown below
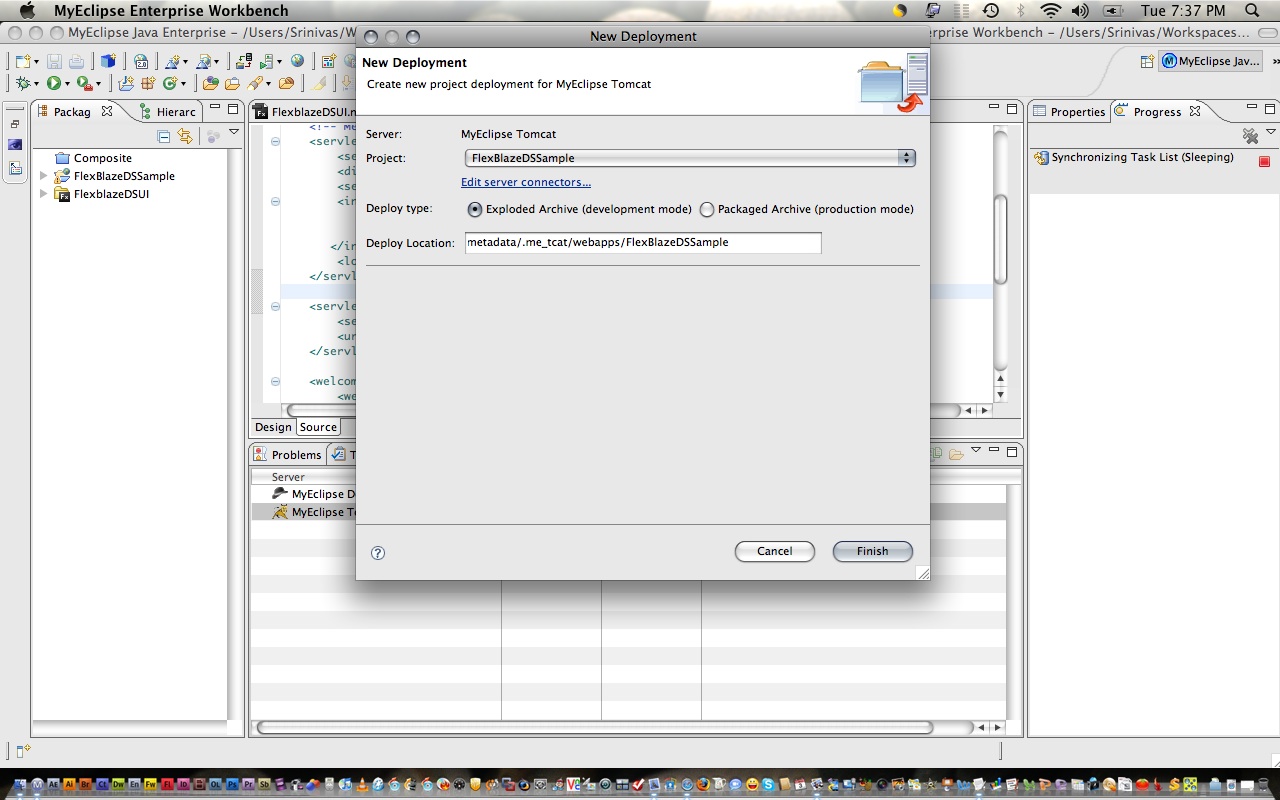
- Click on Finish to deploy the web project. This finishes your first step. Congratulation!!!, you have successfully created BlazeDS based Web Project in MyEclipse & deployed on to integrated Tomcat.
- Now, let’s create Flex Project which will integrate with the web project which was created earlier.
- Either From File Menu or through right click options being Flex Development Perspective, Create new project
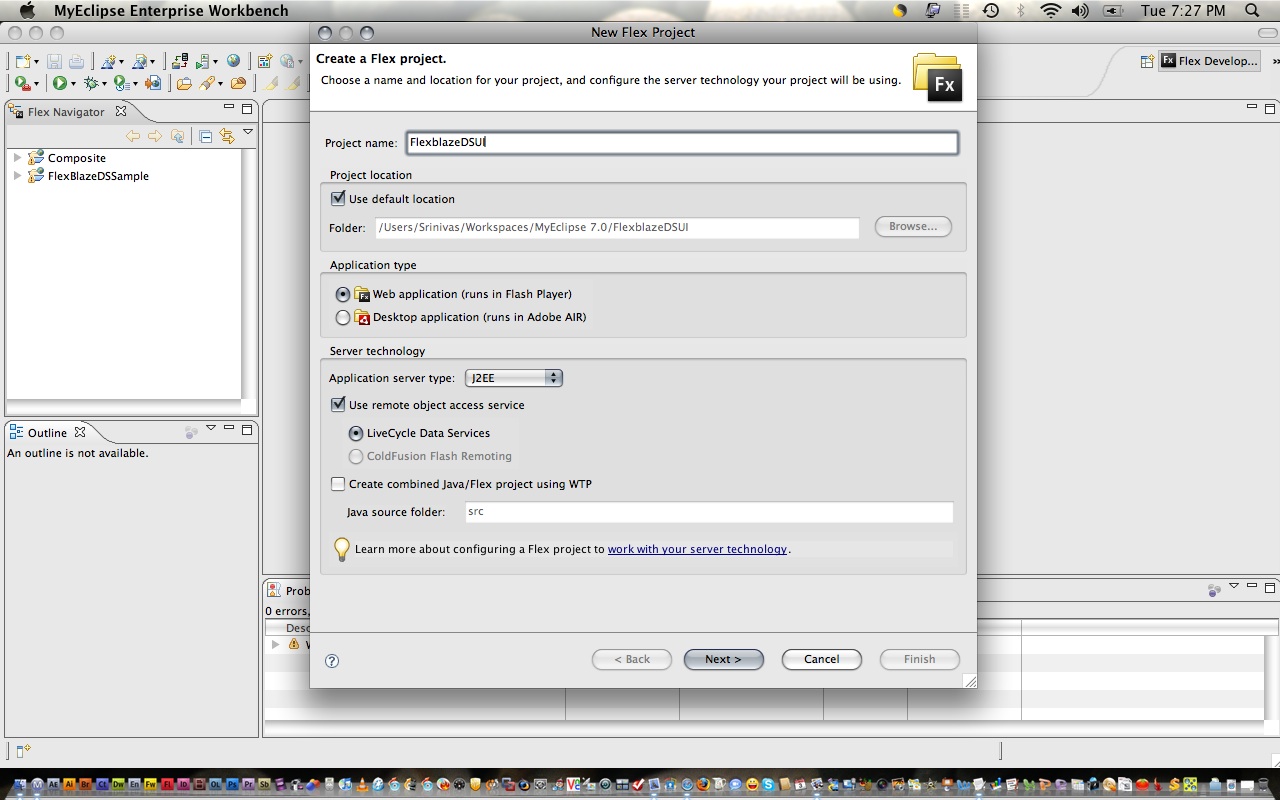
- Fill in the credentials as shown in the above image
- Project Name – “FlexblazeDSUI”
- Project location – “use default location” – You can choose the folder of your choice
- Application Type – “Web Application”
- Server Technology
- Application Server Type – “J2EE”
- check on “use remote object access service”
- “LiveCycle Data Service” Radio button being selected
- Click on Next, you will end up in below screen
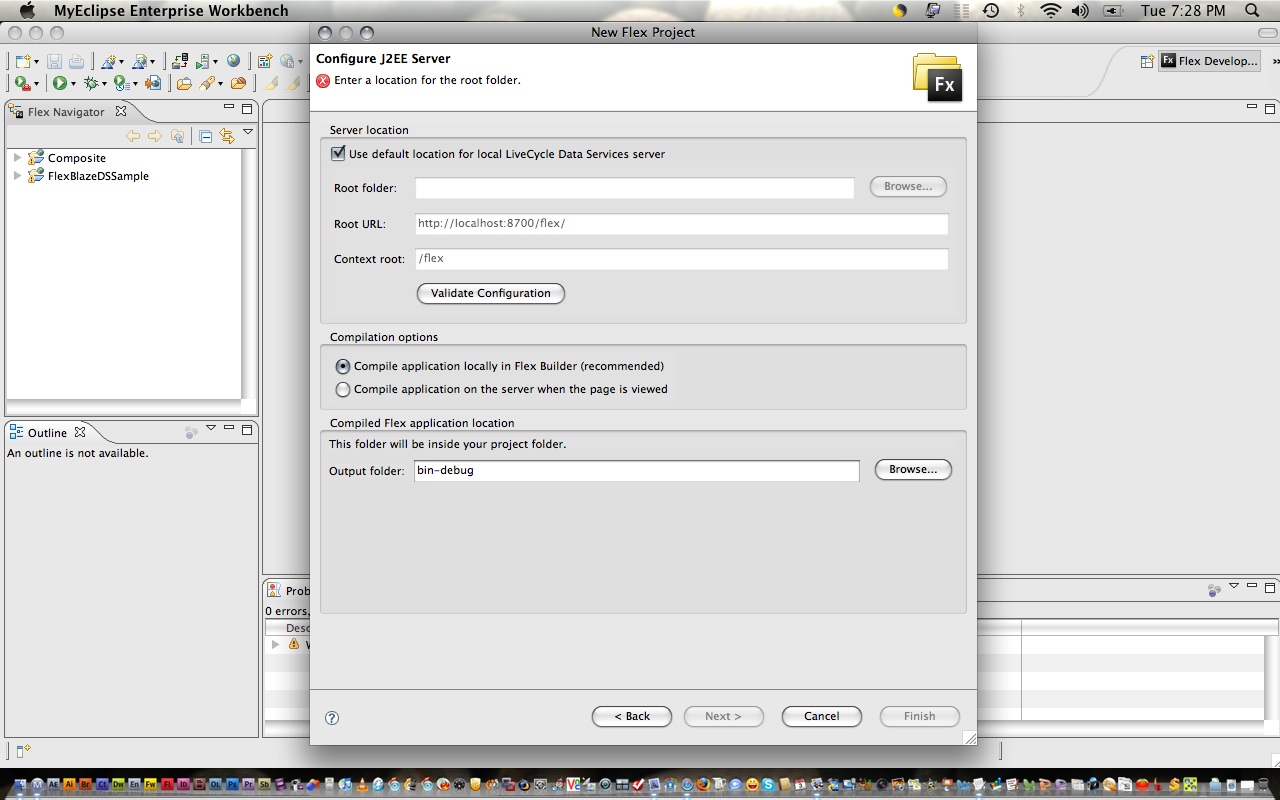
- fill in the form as shown in below picture or snapshot
- For those who cannot see the above image, follow below steps
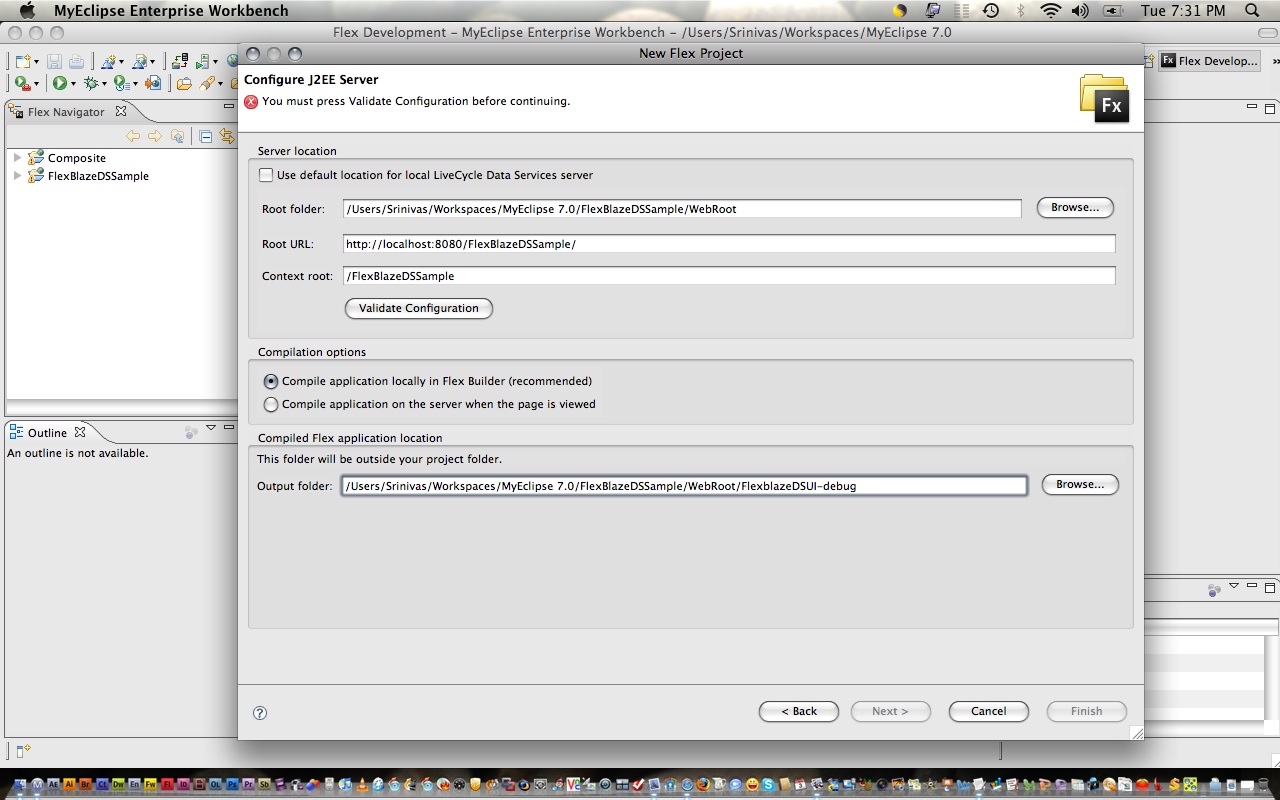
- Server Location – Uncheck “Use default location”
- Root Folder – Browse through the folder structure of your system to Web-Project’s “WebRoot” directory [Above created web project]
- Root Url – type in the full fledge URL to access the web project on the server for me it was “http://localhost:8080/FlexBlazeDSSample”
- Context Root – “/FlexBlazeDSSample” – if you have different context root, specify that here
- Leave compilation options as is.
- Compiled Flex application location – output folder – would have the full path of WebRoot followed by “FlexblazeDSUI-debug”
- remove “FlexblazeDSUI-debug” and live it as shown in the next snapshot
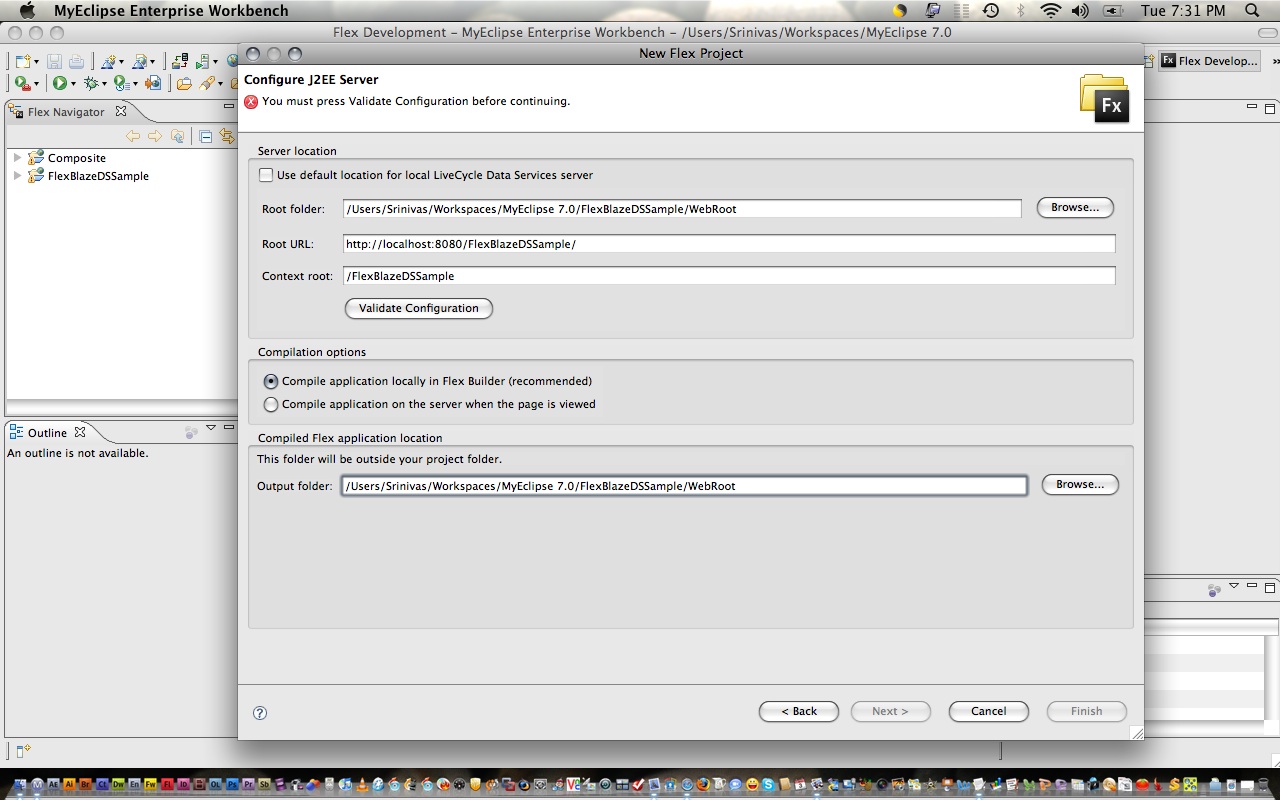
- Now Click on Validate Configuration
- This operation will result in below snapshot
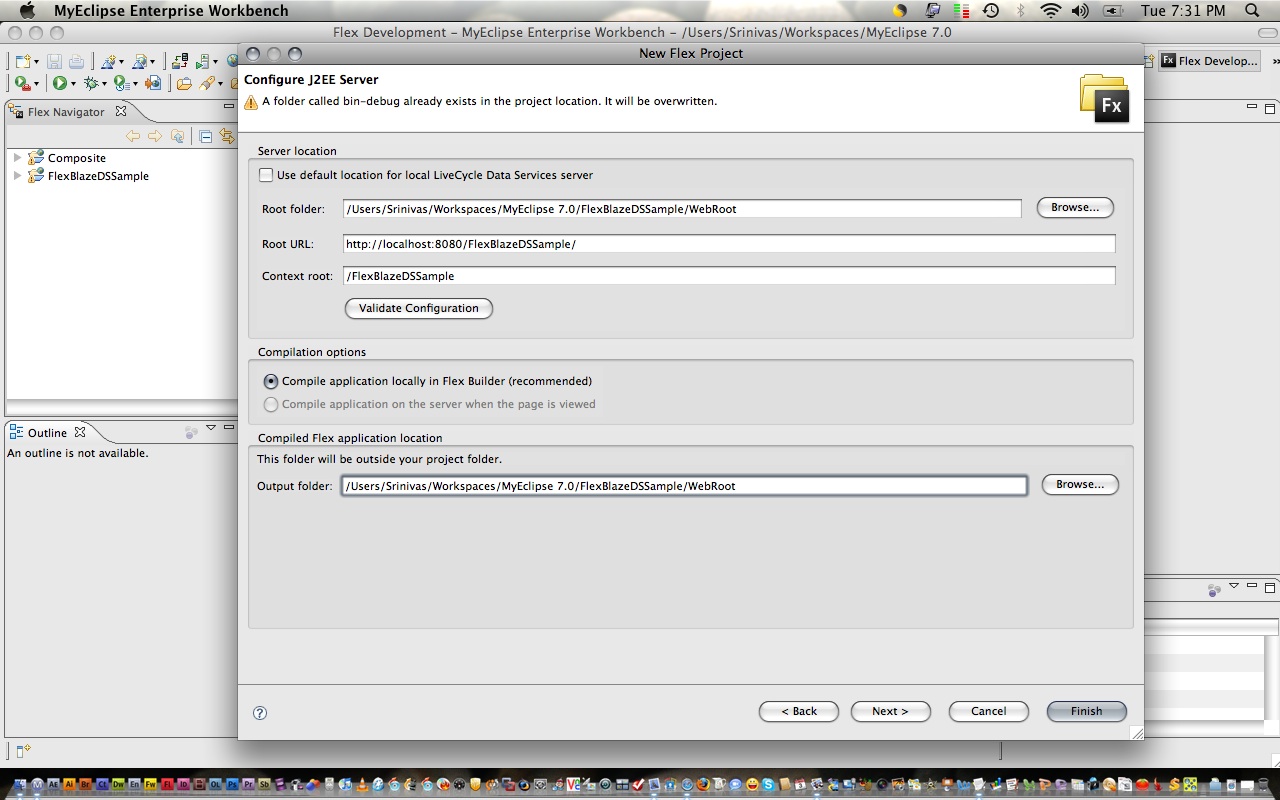
- Click on Finish to complete Project creation and now if you expand the Folder Structure in Navigator or File Explorer should look like below
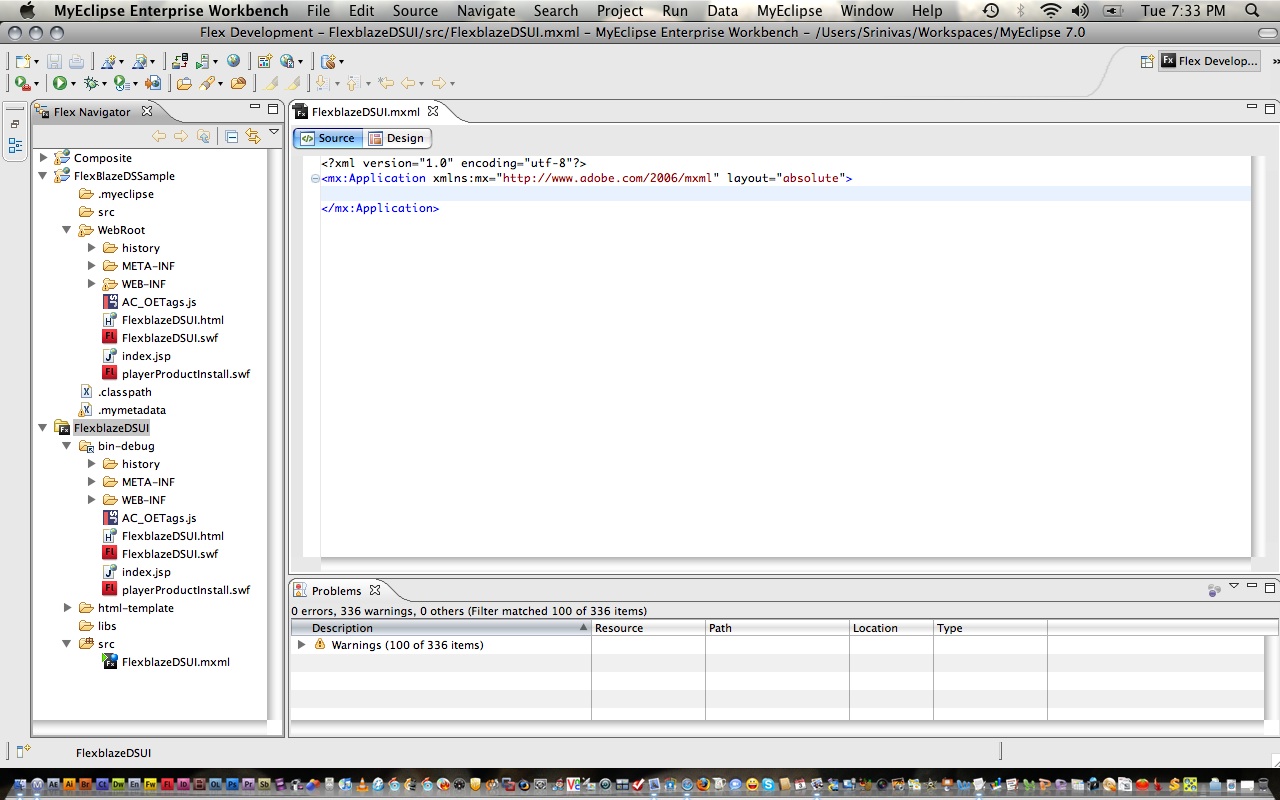
- Click on Run Button selecting Flex Project to see that it opens up URL “http://localhost:8080/FlexBlazeDSSample//FlexblazeDSUI.html”
- The Screen should be empty as it has no source at all.
- Now let’s Create a Java class called “HelloWorld” in “com.test” package in “FlexBlazeDSSample” Web Project
- Copy the below code into the java file
package com.test;
import java.util.Date;
public class HelloWorld {
	private String userSaid;
	public String repeat(String said) {
		this.userSaid = "Reply from server: " + said;
		return this.userSaid;
	}
	public String sayHello() {
		Date now = new Date();
		return "Hello World " + now;
	}
}
- Open Flex MXML file and copy below code
<?xml version="1.0" encoding="utf-8"?>
<mx:Application xmlns:mx="http://www.adobe.com/2006/mxml" layout="absolute">
	<mx:RemoteObject id="myservice" fault="faultHandler(event)" showBusyCursor="true" destination="Hello">
		<mx:method name="sayHello" result="resultHandler(event)"/>
		<mx:method name="repeat" result="resultHandler(event)"/>
	</mx:RemoteObject>
	<mx:Script>
		<![CDATA[
			import mx.managers.CursorManager;
			import mx.rpc.events.ResultEvent;
			import mx.rpc.events.FaultEvent;

			private function faultHandler(fault:FaultEvent):void{
				CursorManager.removeBusyCursor();
				result_text.text = "code:\n" + fault.fault.faultCode + "\n\nMessage:\n" + fault.fault.faultString + "\n\nDetail:\n" + fault.fault.faultDetail;
			}

			private function resultHandler(evt:ResultEvent):void{
				result_text.text = evt.message.body.toString(); // same as: evt.result.toString();
			}
		]]>
	</mx:Script>
	<mx:Button x="250" y="157" label="sayHello" width="79" click="myservice.getOperation('sayHello').send();"/>
	<mx:Button x="250" y="187" label="Repeat" click="myservice.getOperation('repeat').send(myText.text);"/>
	<mx:TextArea x="10" y="36" width="319" height="113" id="result_text"/>
	<mx:Label x="10" y="10" text="Result:"/>
	<mx:TextInput x="82" y="187" id="myText" text="Sent to Server"/>
</mx:Application>
- Save, Select web project back, refresh once, it should deploy the latest files on a web project
- Edited/added April 17th, 2009 – Open “WEB-INF\flex\remoting-config.xml” file in a notepad/wordpad or any editor of your wish, replace the entire content by the following. [Note: If needed you can just compare with existing content and place only “destination” node]
<?xml version="1.0" encoding="UTF-8"?>
<service id="remoting-service" class="flex.messaging.services.RemotingService">
	<adapters>
		<adapter-definition id="java-object" class="flex.messaging.services.remoting.adapters.JavaAdapter" default="true"/>
	</adapters>
	<default-channels>
		<channel ref="my-amf"/>
	</default-channels>
	<destination id="Hello">
		<properties>
			<source>com.test.HelloWorld</source>
		</properties>
	</destination>
</service>
- Save, Select web project back, refresh, it should deploy the latest files on a web project
- Now by selecting Flex Project, Click on the Run button to see the flex application. You should see the screen as shown in the snapshot below
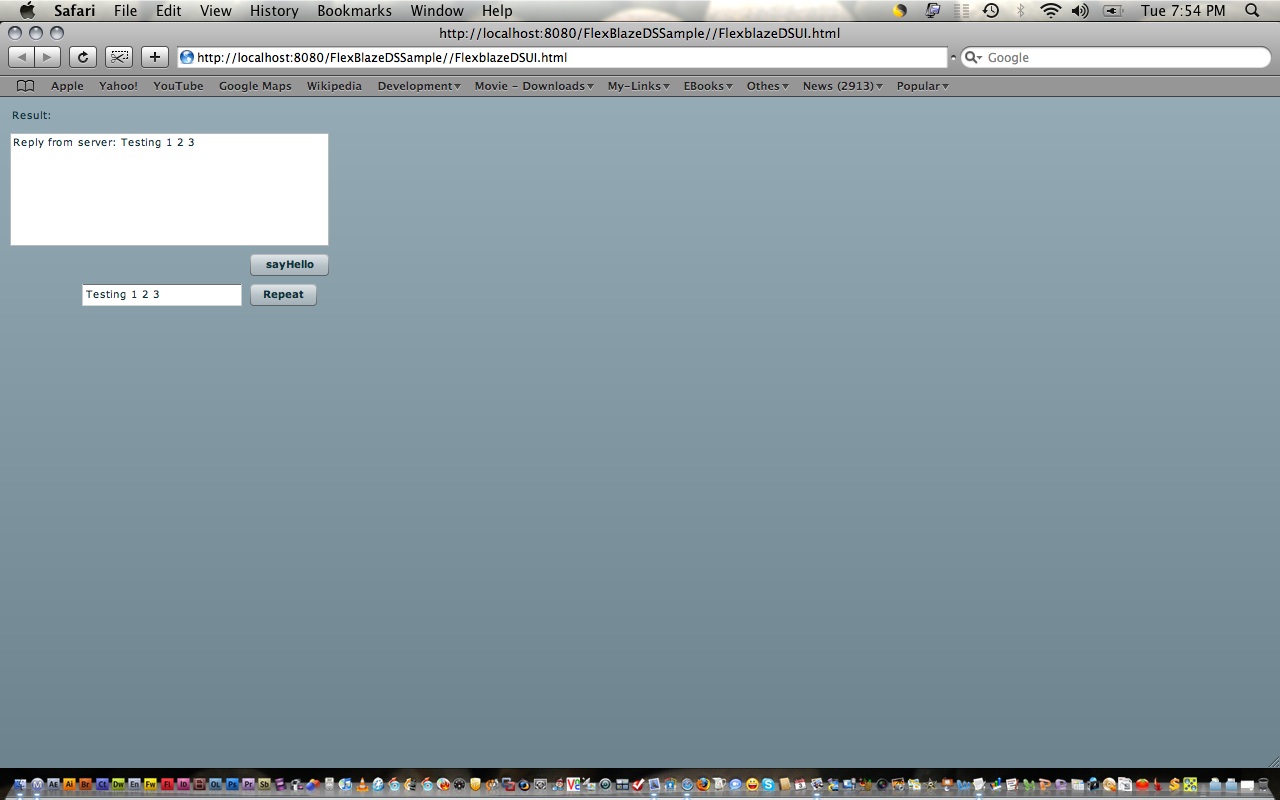
- Click on say hello button to see it’s functionality
- Type in some message in the text box & click on Repeat button to see the same on the text area, which is returned from the server
- There you go, you have successfully integrated BlazeDS + Flex & installed on MyEclipse integrated Tomcat Server too
- I hope I don’t need to explain the example as the code is itself self-explanatory
Hope this was helpful. Please feel free to comment. Open for reviews & comments.
0 thoughts on “Adobe Flex – BlazeDS – Deployment on Tomcat Integrated Server in MyEclipse Integration – Step by Step”
Hi Srinivas,
I am feeling very sad that, after ur so much effort still i am facing on creating Flex project.
Even though I installed with LCDS, Under my eclipse i am not getting Use default LCDS option while creating Flex project under my eclipse. Is there any addtion set up required to get the same.
Note: I am using MyEclipse 7 (Version: 7.0, Build id: 7.0-20081201)
Steps followed on creating Flex project
1 > new- > Flex project
2 > Selected J2ee as application server along with flex project name.
3 > Clicked Next
4 > I not getting the window other than what u showed in the screen shot.
5 > Window i am getting is a “Configure J2EE server” window which as
Under J2EE setting
a > TargerRuntime
b > Context Root
c > Context Folder
d > Flex War file to browse
More importantly, under “output folder “, they mentioned ” This folder must be inside ur project loacation”.
Please provide ur inputs
Regards,
Ashwin.B
Hi Srinivas,
I am feeling very sad that, after ur so much effort still i am facing on creating Flex project.
Even though I installed with LCDS, Under my eclipse i am not getting Use default LCDS option while creating Flex project under my eclipse. Is there any addtion set up required to get the same.
Note: I am using MyEclipse 7 (Version: 7.0, Build id: 7.0-20081201)
Steps followed on creating Flex project
1 > new- > Flex project
2 > Selected J2ee as application server along with flex project name.
3 > Clicked Next
4 > I not getting the window other than what u showed in the screen shot.
5 > Window i am getting is a “Configure J2EE server” window which as
Under J2EE setting
a > TargerRuntime
b > Context Root
c > Context Folder
d > Flex War file to browse
More importantly, under “output folder “, they mentioned ” This folder must be inside ur project loacation”.
Please provide me ur input.
Regards,
Ashwin.B
Hi Srinivas,
As proceeding to out communication, please find the steps I followed.
Steps I followed on Installation of Adobe Flex builder:
1 > Installed MyEclipse 7 successfully under “F: ProgramFileseclipse7”
Steps I followed on Installation of “Life Cycle Data Service E S 2.6.1”
1 > Installed MyEclipse 7 successfully under “F: ProgramFileslcds”
Steps I followed on Installation of Adobe Flex builder:
1 > While installing the Adobe flex builder it will ask for a Eclipse folder which should contain configuration folder, I created an Eclipse folder and map the created folder path while installation ( i.e. under F:ProgramFilesEclipse)
2 > Installation will go successful.
3 > After Installation Adobe will be installed under (F:ProgramFilesAdobe)
4 > Under Adobe folder I can able to see 2 more sub-folder called “ Flex Builder3” and “Flex Builder3Plug-in”
Steps I followed to Add Flex plug-in ( Flex Builder integration ) to MyEclipse 7:
1 > Followed the exact steps as mentioned on your article 1.
2 > after following the steps I followed it will ask for a restart my Eclipse.
3 > After Reopen the MyEclipse, I can able to see Flex related menu under Help section.
Steps I followed after all these steps:
1 > Configured Installed flex sdk’s, i.e under My Eclipse’s Preferences – >Flex->Installed SDK’s
2 > Added Flex 3.2.0 and Flex 2.0.1 version from “ F:Program FilesAdobeFlex Builder 3 Plug-insdks”
1 > Configured tomcat server, i.e under My Eclipse’s Preferences – >MyEclipseEnterprise workbench ->Server- > Tomcat->Tomcat6.x
2 > Selected the “Enable Server” option.
3 > gave the tomcat installed path ( tomcat installed with LCDS installation) to tomcat Home directory.
4 > i.e. F:lcdstomcat. Note that that tomcat is installed under lcds folder
Steps Followed to create a new Web Project:
1 > Followed the exact steps mentioned in the article2.
2 > Able to create a web project successfully (WsrManagerWeb).
3 > Copied the “META-INF” & “WEB-INF” folder of “blazeDS.war” under Web project (WsrManagerWeb) WebRoot directory.
4 > after this, I can able to see blaze Ds file under WEB-INF- > Flex folder in Web project (WsrManagerWeb)
5 > I can able to do the deployment of web project (WsrManagerWeb).
6 > after deployment copy of my web project will create under tomcat- > webapps folder
Steps Followed to create a new Flex Project:
1 > Change to Flex development perpective.
2 > File- > New-> Flex project.
3 > Inputted Project Name as (“FlexWsrManagerWeb)
– > Application server as – Web application
– > Application server type – J2EE
– > Checked “ Use remote access service Object ” option
– > Enable “Live cycle Data services” option
4 > After Clicking on “Next “ button, I am getting Configure J2EE server window.
5 > This window is not same as you mentioned the article 2.
6 > This window contains information about, Under J2EE setting
– > Targer Runtime
– :> Context Root
– > Context Folder
– > Flex WAR file ( to browse) and Under Compilation option
It is enabled with “ Compile application locally in Flex Builder ” option.
– > Under CompileFlex Application location, they are saying that “ This folder will be inside your project folder”
7 > I don’t know, hw to map Web project(“FlexWsrManagerWeb ) WebRoot directory under this. If I map this path, it is not allowing me to proceed further
May be I missed out the integration of LCDS to myeclipse . If yes, please let me the steps to do the same. Thanks for the needful inadvance.
Waiting for ur reply.
Regards,
Ashwin.B
It was a typo on my previous update, Please consider as “our” instead of “out”.
Hi Srinivas,
I was followed all your steps properly. The only mistake I have done is to forget to uncheck “Create combined Java/Flex project using WTP”.
It is working fine now. I can able to deploy the project. Also able to run successfully by using Remote data objects.
Thank you very much for your massive patience to help me out from this issue. I feel now I can go ahead to proceed further on the Flex utilities.
Regards,
Ashwin.B
Hi Srinivas,
I facing problem with fetching week dates using flex. Can you help me out to get
“Logic to display out last 4 weeks start and end date from current date using flex or action script”
Regards,
Ashwin
Hi Srinivas,
I am facing problem on using dtae utilities of flex. Can you help me out to get “logic to display out last 4 weeks start and end date from current date” using flex or action script.
Regards,
Ashwin.B
Hi Ashwin,
Sorry was out of blog for quite sometime now.. If you have any special requests like this please send me email from now on. regarding the problem, the statement was not quite understandable to me. Can you please help me to understand what exactly you are trying to achieve here. If you can help me in that, of course i can help you.
Regards
Srinivas
Great tutorial!!!
Hi,
code:
InvokeFailed
Message:
[MessagingError message=’Destination ‘Hello’ either does not exist or the destination has no channels defined (and the application does not define any default channels.)’]
Detail:
Couldn’t establish a connection to ‘Hello’
I am getting this message. Any ideas?
Hi Gerald,
Seems like your destination is not reachable. Can you check your blazeDS configuration file!!. Mean while thanks for reminding me that configuration part is missing in the post. I have updated the post with configuration part. Please check back.
Thanks
Srinivas
Hi Srinivas,
I’ve updated the file and it is working now. Do you know why in the URL we have 2 slashes.
For example http://localhost:8080/FlexBlazeDSSample//FlexblazeDSUI.html. Why is there 2 slashes in front of FlexblaeDSUI.html?
Hi Gerald,
Sorry for delay. Sometimes it’s so happens, that in your run configuration or in your server configuration, you would see extra “/” present & hence you would see 2 forward slashes in the url. Kindly check both the places. Run > Run Configurations & Flex project > Properties > Flex Server. Hope this resolves. If not please let me know. I promise to return mail immediately. I won’t take time.
Regards
Srinivas
You forgot the adapter;
com.test.HelloWorld
Hello Srinivas ,
Thanks for the tutorial .I was able to setup flex java project but my flex code is not calling my java code . I have some doubt with my web.xml .Following is code for that .
BlazeDS
BlazeDS Application
flex.messaging.HttpFlexSession
MessageBrokerServlet
MessageBrokerServlet
flex.messaging.MessageBrokerServlet
services.configuration.file
/WEB-INF/flex/services-config.xml
1
MessageBrokerServlet
/messagebroker/*
index.html
index.htm
<!–
Flex Messaging WorkManager
wm/MessagingWorkManager
com.ibm.websphere.asynchbeans.WorkManager
Container
Shareable
–>
I can see that u r calling services-config.xml but where is our remote-config.xml .I am very new to flex and I appreaciate ur help .
I have the same problem as Gerald but with the updated remoting-config.xml. The app can’t find the destination. Any ideas?
Excellent Srinivas, I am a beginner in Flex and I could set up my LCDS and MyEclipse and run the application.
Thanks for the detailed posting.
Regards,
Santhosh
Hi Srinivas,
It is really great tutorial for beginers. But i have a problem when i see in the address bar it is : http://localhost:8080/FlexBlazeSample/FlexProject-debug/FlexProject.html instead of
http://localhost:8080/FlexBlazeSample/FlexProject.html. what i am doing wrong.
I want to know one thing also How do i access Jasperserver Web Service in my Flex Based web Application. Can i have a sample for it .
Regards
Vishal
what should be the root folder and root url if the server is a j2ee application server (eg. Glassfish)
Hi Manzoor,
Sorry I was little busy in the project hence couldn’t reply. In case of Application Server, the project’s WAR’s WEBContent folder or WEBRoot folder would be the root folder.
Thanks
Srinivas